Fixel FFT Wizard 2 - User Guide 6 June 2020
![]()
Fixel FFT Wizard 2 - Free Pattern Suppression Fast Fourier Transform FFT Plug In for Photoshop - User Guide
Introduction
Fixel FFT Wizard 2 is a simple and effective tool for periodic pattern suppression and denoising. It removes periodic patterns from images that cannot be removed by traditional means such as paper texture and halftone patterns.
The User Interface (UI) utilizes automated guided procedure to effectively remove and suppress periodic patterns. The procedure was created by Jonas Madsen Rogne and fully integrated into Fixel FFT Wizard 2.
Fixel FFT Wizard 2 is the 2nd generation of the Fixel Zone Selector family.
This version adds the following features:
- HTML Based UI
New UI for optimized and intuitive workflow build around Adobe Photoshop’s HTML Panel technology.
Unlike classic Plug In’s Fixel FFT Wizard 2 can be used as a side panel with the image always available for peaking, zooming and panning. - Automated Guided Integrated Procedure
Step by step guided procedure to automatically remove / suppress periodic noise.
Fully integrated into the UI.
This user guide presents Fixel FFT Wizard 2 to the user with simple guidelines on how to use properly to achieve optimal results.
Installation
The installation is automated using the Windows and macOS installers.
Please follow the following steps:
- Verify Adobe Photoshop is not running.
- Unzip the
ZIPfile downloaded on purchase. - Run the installer inside the
ZIPfile:- Windows - Double Click
Fixel FFT Wizard 2 - Windows Installer.exeinstaller and follow instruction.
The user may be asked for Administrator privileges in order to install the Plug In. - macOS - Double Click on
Fixel Zone Selector - macOS Installer.dmgdisk image and follow instructions.
The user may be asked for Administrator privileges in order to install the Plug In.
- Windows - Double Click
- Start Adobe Photoshop and launch the UI by going
Window -> Extensions -> Fixel FFT Wizard 2(See below).
If any issue arises, please refer to Fixel FFT Wizard 2 Installation Guide.
Fixel FFT Wizard 2 UI
This section will show Fixel FFT Wizard 2 User Interface (UI) and how to use it.
Launching FFT Wizard 2 User Interface (Panel)
In order to launch the panel the user should:
- Open Photoshop.
- In Photoshop menu click on
Window -> Extensions -> Fixel FFT Wizard 2.
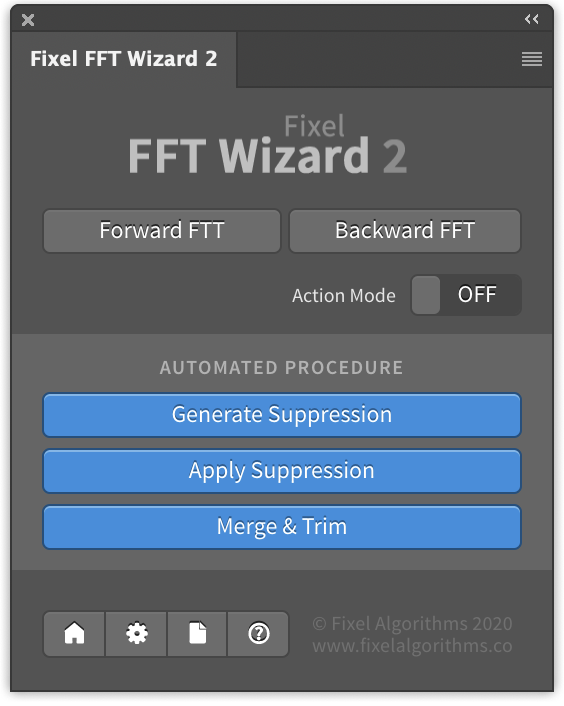
Once done, the FFT Wizard 2 UI will present itself:

The UI enable simple and intuitive operation of the periodic pattern suppression process.
The panel allows the user to interact with the image while adjusting its parameters as it was any other native Panel of Photoshop.
Namely you can zoom in, zoom out, do panning, change opacity or visibility while interacting with the panel.
Main Window UI Components
This section elaborates on each UI Component.

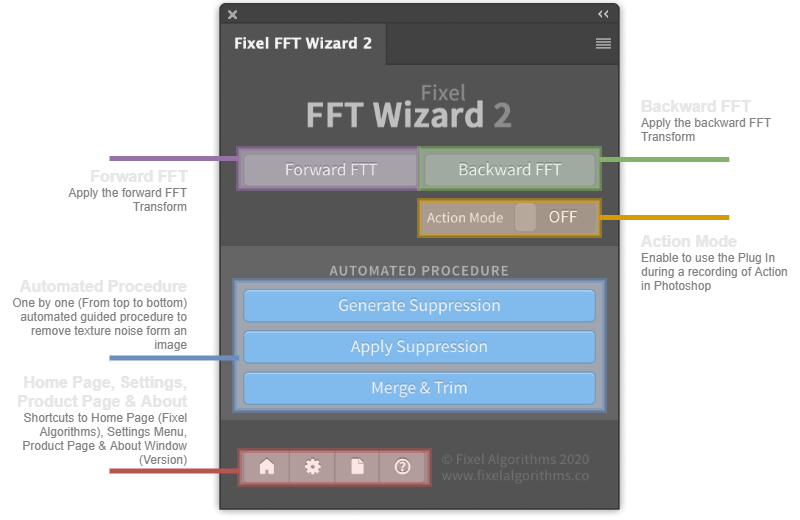
As can be seen above, the Panel is composed of 4 main sections:
- Forward / Backward FFT.
Apply forward / backward FFT Transform on the image. First the user should use Forward transform. It is applied on Merge Visible.
After the user adjusted the Amplitude Layer of the Forward transform the Backward transform should be applied. - Action Mode.
Set toONin order to be able to record the Plug In steps as part of an Action. - Automated Procedure.
Set of 3 procedures, with guidance to, to be applied one by one (Top down) in order to suppress periodic noise. - Home Page, Settings, User Guide and About Screen Link Buttons.
Home Page opens a browser with the Fixel Website, Settings opens the Settings Window (See below) of the Plug In, User Guide open a web browser with this address and the About icon opens a window with the version string of the Plug In.
The main feature of the Plug In is being able to include or exclude tonal ranges (Zones) form the output.
While most Luminosity Masks Actions / Panels just automates Photoshop procedure Fixel FFT Wizard 2’s algorithm is implemented by a proprietary Plug In. It is not constrained by the limitations of Photoshop’s tools as described in Luminosity Mask - How Does It (Really) Work? and Luminosity Mask Done Right! posts.
Hence the user, at most time, will easily achieve the results with the highest quality in the industry.
Settings Window Parameters
Currently there are no user controlled settings.
Using Fixel FFT Wizard 2
This section describe how to use Fixel FFT Wizard 2.
Workflow
Fixel FFT Wizard 2 is designed to give the user effortless ability to generate the Luminosity Masks with pinpoint accuracy.
The recommended usage of Plug In is as following:
- Start a new session by launching the Panel.
Make sure the active layer is the layer to be used as reference for the mask generation.
The Plug In will add a Mask Channel automatically. - Interact and adjust its parameters to taste.
- Toggle between
Composite/Maskmodes to evaluate result. - Tweak parameters to adjust output to taste.
When done with the Plug In, continue working on Photoshop.
You may return to the layer of interest to tweak result as needed.
Example of Use - Forward Backward
Fixel FFT Wizard 2 is as simple as it gets as it does only one thing - Apply Forward / Backward FFT on an image.
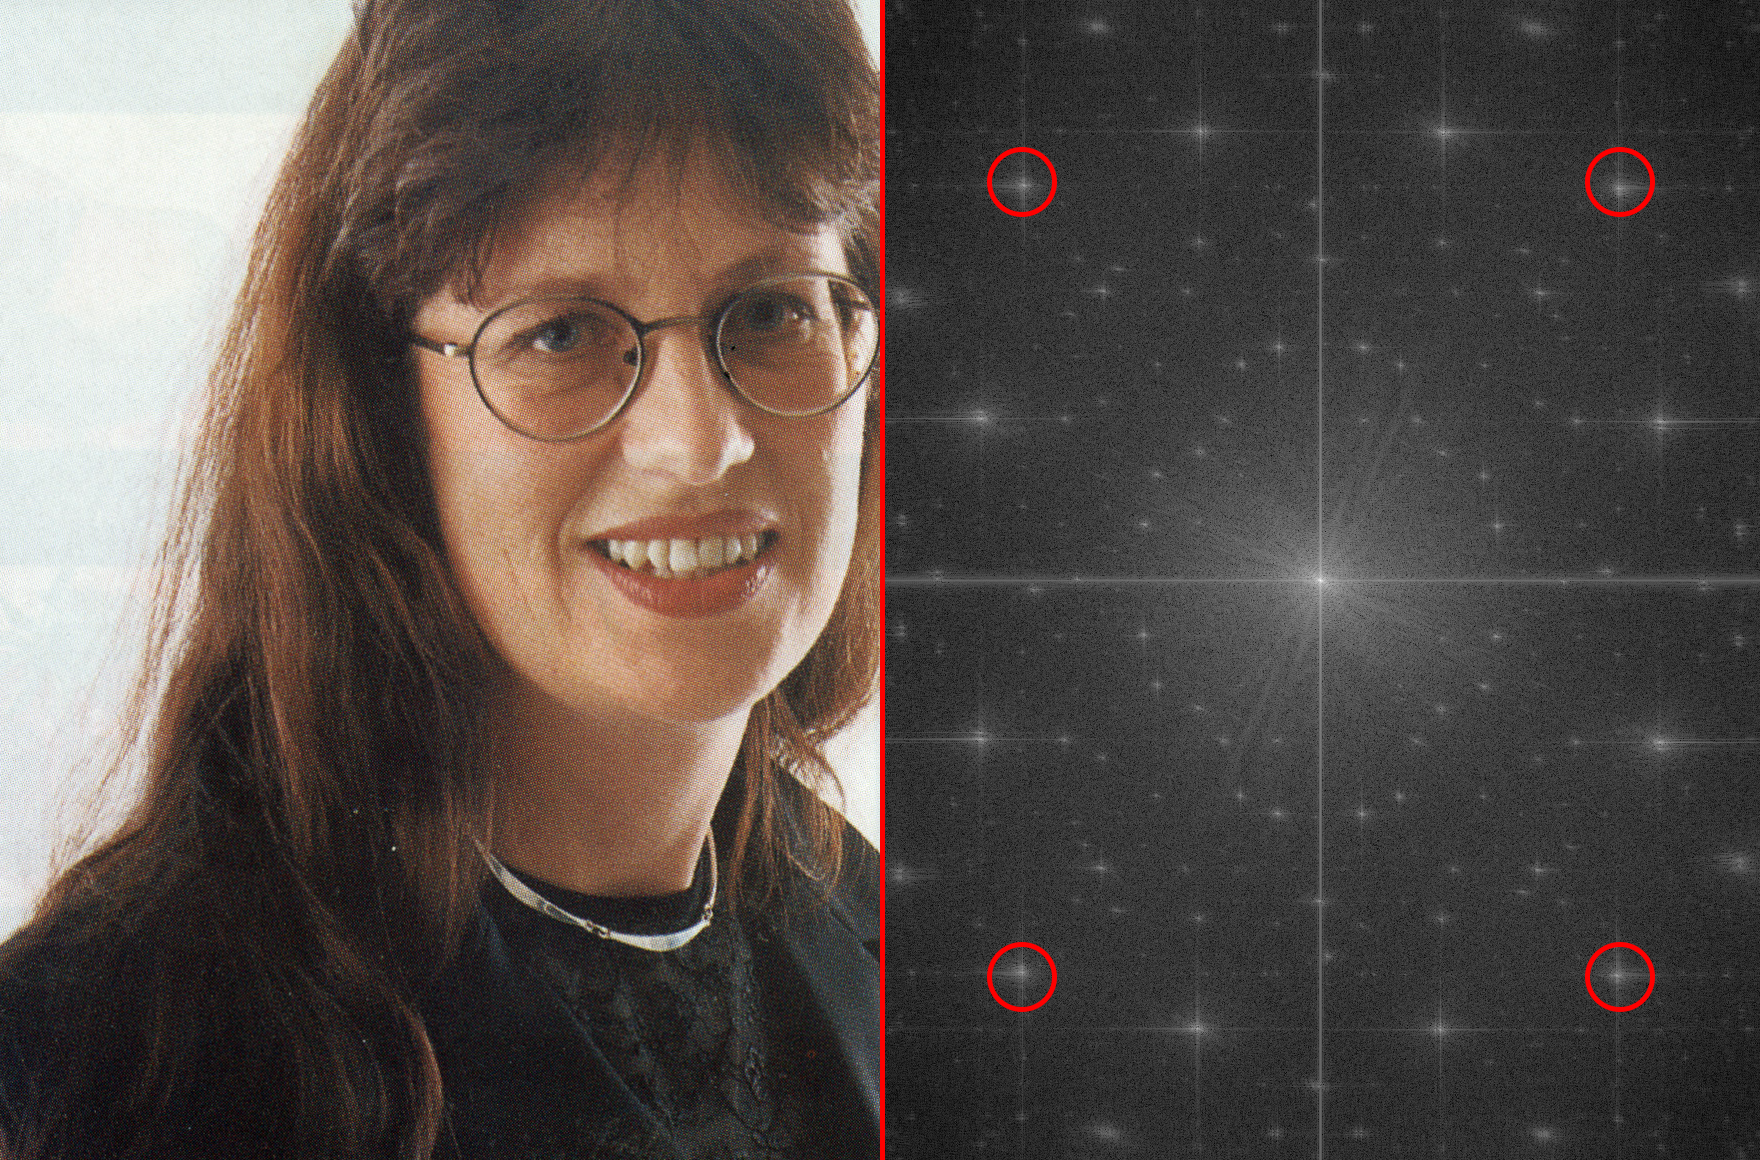
Assuming we start with a simple image (Image is a courtesy of Jonas Madsen Rogne):

As can be seen, the image has a pattern nose one would like to remove.
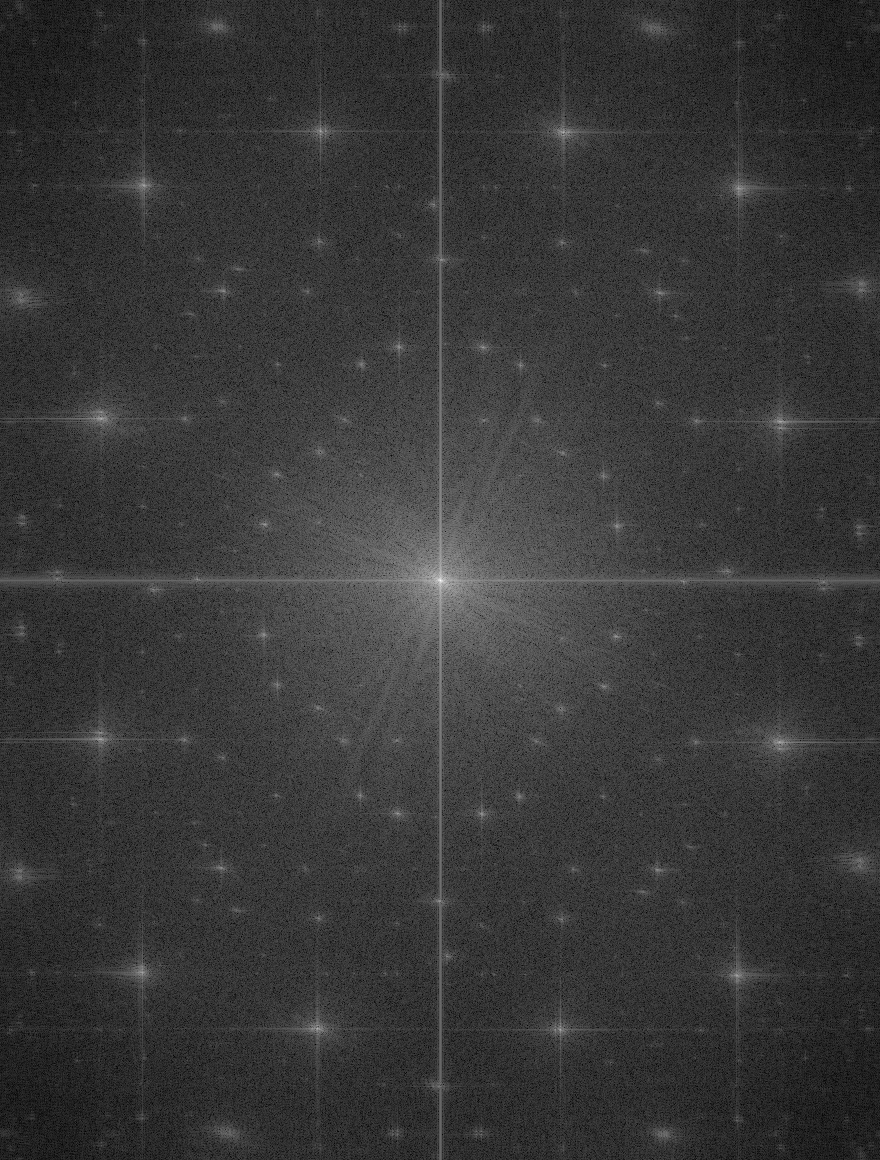
Applying the *Forward FFT` yields:

The above image is the Red Channel of the image. The plug In returns the Amplitude of the FFT in the Red Channel, the phase in the Green Channel and the Luminosity Channel of the image itself on the Blue Channel.
The UI automatically sets the active channel to be the Red Channel hence the Amplitude is shown. One could see that the Amplitude is symmetric in all 4 quadrants.
Periodic signals, as well as noise, in the FFT look like bright spots which are farther away from the center of the Amplitude image.
For instance, few of them are marked in the following spectrum:

The steps to denoise / suppress the pattern noise is to chose the Paint Tool and paint them in black. Mathematically it means we remove the energy of painted frequency which suppress the pattern it causes.
Since the image is symmetric, one needs to apply this on each quadrant. In order to do it efficiently, one should use the Symmetric Paint option introduced in Photoshop CC 2018 as following (Please use Full Screen):
So the procedure in general, using Forward Backward is:
- Apply Forward FFT on the image. The UI will automatically chose the Amplitude to process.
- Color with pure black the bright spots far from the center.
- Apply Backward FFT. The UI will automatically set the blend mode to Luminosity.
Example of Use - Automated Guided Procedure
One could also utilize the built in procedure (By Jonas Madsen Rogne). The best guide to use it is the video by the creator himself:
Instead of installing and clicking the Action one should just use the buttons in Fixel FFT Wizard 2 from top to bottom.
Tips & Tricks
There are some simple guidelines to keep in order to maximize the effectiveness when using Fixel FFT Wizard 2:
- With Photoshop Version CC 2018 and above it is advised to use Paint Symmetry feature in order to paint on all 4 quadrants at once.
- In order to prevent quantization errors, it is recommended to use the Fixel FFT Wizard 2 Plug In]98 in 16 / 32 Bit Mode.
- There are many tutorials about FFT Denoising in Photoshop (All work with the same idea). Here are those we selected to share:
Looking for Texture Removal, Pattern Denoising or FFT Photoshop in YouTube will yield many more guides / tutorials.
Summary
Fixel FFT Wizard 2 is a free simple tool for the task of Image Restoration using the Discrete Fourier Transform (Implemented as Fast Fourier Transform - FFT).
It is very effective in suppressing / denoising / removing pattern noise / periodic textures. Enjoy it…
Resources
- Fixel FFT Wizard 2 Product Page.
- Fixel FFT Wizard 2 Installation Guide.
- Fixel FFT Wizard 1 Product Page.
- Fixel FFT Wizard 1 - Blog Post.
- Pattern Suppressor Tutorial v2.
Key Words: Fixel Algorithms, Fixel, Fixel FFT Wizard, Image Restoration, Fast Fourier Transform, FFT, Periodic Pattern Suppression, Periodic Pattern Removal, Periodic Pattern Denoising, Photoshop, Plug In, Photoshop Plug In.