Fixel EdgeHancer 3 - User Guide 27 November 2019
![]()
Fixel EdgeHancer 3 - Simple, Smart & Effective Edge Enhancer Filter - User Guide
Introduction
Fixel EdgeHancer 3 is all about enhancing edges. If you want to enhance a texture, hair, fabric, wood, fur, etc… this is the Plug In you need.
Fixel EdgeHancer 3 is the 3rd generation of the Fixel EdgeHancer family.
This version adds the following features:
- Edge Preserving Engine
The new engine is built on a Local Edge Preserving Filter which combines speed and quality. It assists in reducing the artifacts and halos which are common in sharpening.
The new engine gives the user the ability to push farther the sharpening level for Halos Free stunning results. - HTML Based UI
New UI for optimized and intuitive workflow build around Adobe Photoshop’s HTML Panel technology.
Unlike classic Plug In’s Fixel EdgeHancer 3 can be used as a side panel with the image always available for peaking, zooming and panning.
The new UI also adds 3 user adjustable presets to allow user have more efficient workflow.
This user guide presents Fixel EdgeHancer 3 to the user with simple guidelines on how to use properly to achieve optimal results.
Installation
The installation is automated using the Windows and macOS installers.
Please follow the following steps:
- Verify Adobe Photoshop is not running.
- Unzip the
ZIPfile downloaded on purchase. - Run the installer inside the
ZIPfile:- Windows - Double Click
Fixel EdgeHancer 3 - Windows Installer.exeinstaller and follow instruction.
The user may be asked for Administrator privileges in order to install the Plug In. - macOS - Double Click on
Fixel EdgeHancer - macOS Installer.dmgdisk image and follow instructions.
The user may be asked for Administrator privileges in order to install the Plug In.
- Windows - Double Click
- Start Adobe Photoshop and launch the UI by going
Window -> Extensions -> Fixel EdgeHancer 3(See below).
If any issue arises, please refer to Fixel EdgeHancer 3 Installation Guide.
Fixel EdgeHancer 3 UI
This section will show Fixel EdgeHancer 3 User Interface (UI) and how to use it.
Launching EdgeHancer 3 User Interface (Panel)
In order to launch the panel the user should:
- Open Photoshop.
- In Photoshop menu click on
Window -> Extensions -> Fixel EdgeHancer 3.
Once done, the EdgeHancer 3 UI will present itself:
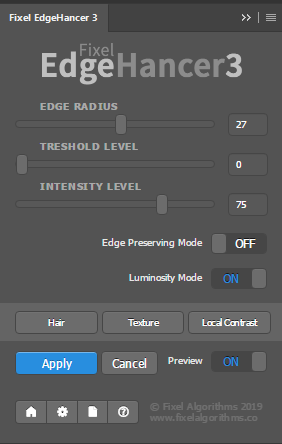
The UI enable simple and intuitive operation of the edge enhancement process.
The panel allows the user to interact with the image while adjusting its parameters as it was any other native Panel of Photoshop.
Namely you can zoom in, zoom out, do panning, change opacity or visibility while interacting with the panel.
Main Window UI Components
This section elaborates on each UI Component.
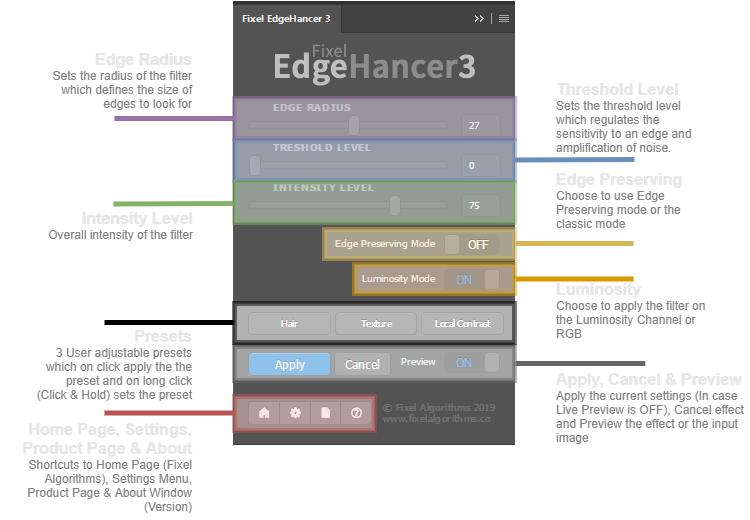
As can be seen above, the Panel is composed of 4 main sections:
- Plug In Parameters
- Edge Radius and Threshold Level Sliders.
Sets the radius of the edges to be enhanced and the threshold level to regulate noise amplification. - Intensity Slider.
Sets the overall intensity of the filter. - Edge Preserving Mode.
When set toONthe filter is applied on the Luminosity Channel of the image (Saturation and Hue channels are untouched). - Luminosity Mode.
When set toONthe filter is applied on the Luminosity Channel of the image (Saturation and Hue channels are untouched).
- Edge Radius and Threshold Level Sliders.
- User Adjustable Presets.
Allows the user to apply pre defined presets by clicking a preset button or setting a preset by long click (Click & Hold) which freezes the current settings into a preset. - Panel State Elements - Apply, Cancel and Preview.
In case theLive Viewis disabled one must click onApplyto run the filter. The button Cancel cancels the effect and restore the image into its original form. The Preview button toggles between seeing the input image and the output image. - Home Page, Settings, User Guide and About Screen Link Buttons.
Home Page opens a browser with the Fixel Website, Settings opens the Settings Window (See below) of the Plug In, User Guide open a web browser with this address and the About icon opens a window with the version string of the Plug In.
The main feature of the Plug In is being able to truly enhance edges in a manner which can not be found anywhere else.
Hence the user, at most time, will interact with the 2 upper sliders to adjust the Plug In effect to taste.
Settings Window Parameters
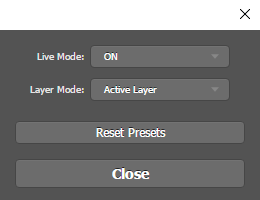
The settings window is controlling 2 main parameters of the behavior of the Plug In.
 |
 |
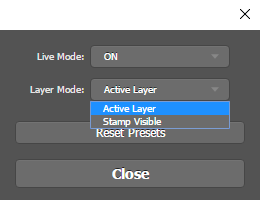 |
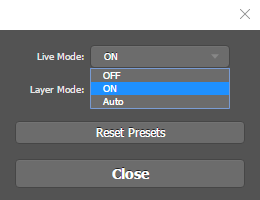
As can be seen above, the parameters are:
- Live Mode
ON(Default) - The output image is updated with each interaction with the main panel window.
For instance, any movement of any slider of the different scales will run the Plug In and render the output.OFF- The output image isn’t updated automatically as above. In order to update the output image according to the Plug In’s parameters one must clickApply.Auto- For images which are less than4MPthe Plug In will behave as it is inONmode. For images larger than4MPit will behave asOFF.
- Layer Mode
Active Layer(Default) - The Plug In will work on the current layer (Given it is a Bit Map / Rasterized Layer) of Photoshop and will adjust it according to parameters.Stamp Visible- The Plug In will create a new layer from the current view and will use it as input image.
- Reset Presets
Reset the presets of the panel to their default values.
The defaults should imitate behavior of a classic plug in’s.
The settings are saved in a user preference file and kept between Photoshop sessions.
Using Fixel EdgeHancer 3
This section describe how to use Fixel EdgeHancer 3.
Workflow
Fixel EdgeHancer 3 is designed to give the user the experience of classic Plug In yet within Photoshop main window.
The recommended usage of Plug In is as following:
- Start a new session by launching the Panel.
- Interact and adjust its parameters (Move a slider).
- Pan & Zoom In / Out to evaluate result.
- Tweak parameters to adjust output to taste.
- Use
Previewswitch to compare output to input.
When done with the Plug In, continue working on Photoshop.
The next time the user interacts with the panel it will start a new session.
Effect of Parameters
Fixel EdgeHancer 3 has few parameters to adjust.
This section will focus on the ability of Fixel EdgeHancer 3 (Basically the whole Fixel EdgeHancer family) to enhance edges.
EdgeHancer can target different sizes (Radius) of edges by adjusting its parameters.
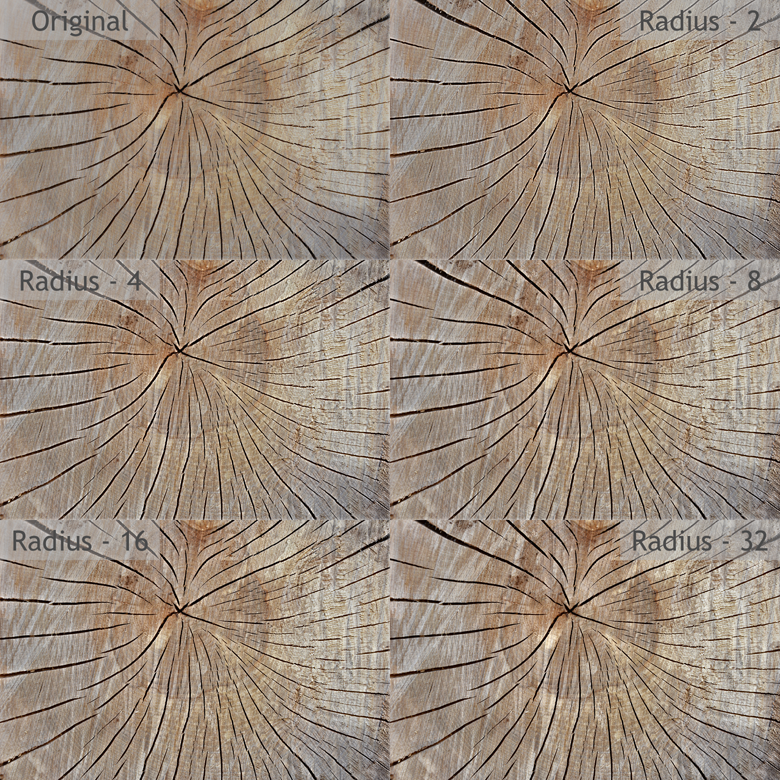
In the above figure one could see 6 images where one is the Original Image and all the other are created by applying Fixel EdgeHancer 3 with different radius as written. As can be seen, the radius parameter allows targeting different size of edges to enhance.

The above figure is displays the effect of the Threshold Level parameter.
The Threshold Level parameter allows regulating the effect in order to prevent noise and artifact amplifications.
As can be seen above, with higher regulation the over sharpened edged are regulated and the effect is limited on those.

The above image displays the effect of the Luminosity Mode parameter.
The Luminosity Mode toggles whether to run the effect on Luminosity Channel only (When set to On) or on each of the RGB channels (When set to Off).
As can be seen above, When set to Off the result is more saturated yet with more color shift which is a balance to be chosen by the user.
Pay attention that when set to Off it means the filter is running 3 times, which, trivially, takes more time.

The above image displays the effect of the Edge Preserving Mode parameter.
The Edge Preserving Mode toggles whether to use Edge Preserving algorithm (When set to On) or use the classic algorithm (When set to Off).
As can be seen above, When set to On the Halos are almost completely eliminated. The result is more subtle.
The Edge Preserving engine is a new feature in version 3 and creates completely new effect.
Tips & Tricks
There are some simple guidelines to keep in order to maximize the effectiveness of using Fixel EdgeHancer 3:
- The Radius parameter should match the size of the edges one wants to enhance.
- By turning on the Edge Preserving Mode one could achieve more subtle effect.
- When using high values one might want to use
Luminosity Modeset toOFFin order to prevent reduction in saturation. In most cases one should setLuminosity ModetoOFFfor no color shift and faster execution.
Showcase
This section shows few images with Before & After animation. Under each image one could see the settings used to generate result.
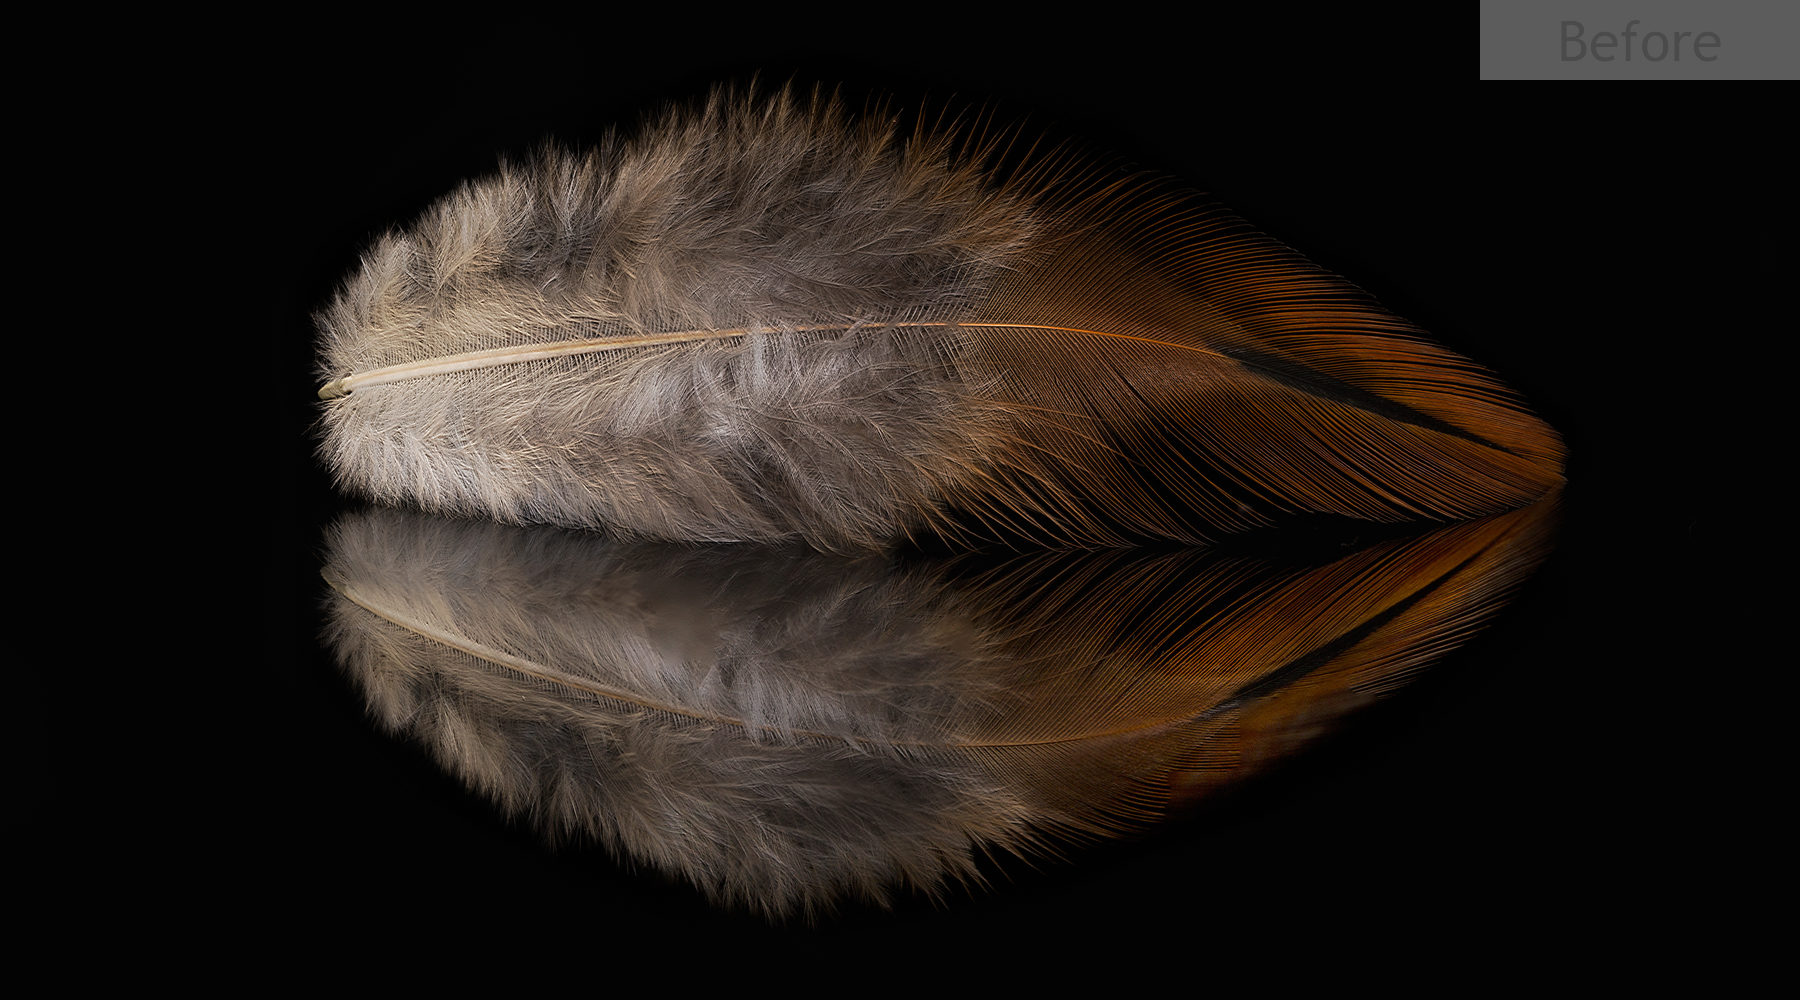
Edge Radius = 3, Threshold Level = 0, Intensity Level = 90, Edge Preserving Mode = OFF, Luminosity Mode = ON
Edge Radius = 12, Threshold Level = 15, Intensity Level = 75, Edge Preserving Mode = OFF, Luminosity Mode = ON
Edge Radius = 2, Threshold Level = 0, Intensity Level = 100, Edge Preserving Mode = OFF, Luminosity Mode = OFFUsers Showcase
This section displays images created by users of Fixel EdgeHancer 3.

Created with Fixel Algorithms
Credit: spotshow13235 by Ossst Dzesss
Summary
Fixel EdgeHancer 3 is a different kind of a sharpener. It enhance edges by utilizing a unique algorithm which was specifically developed for this task. While Fixel EdgeHancer 2 brought the concept of targeting edges specifically surpassing any classic sharpening tool (High Pass Sharpening, Unsharp Mask, Smart Sharpen) Fixel EdgeHancer 3 brings another jump forward - Edge Preserving Based & Halos Free Edge Enhancement.
It is intuitive and easy to use (Classic Plug In behavior within Photoshop Main Window) yet in utilizes state of the art algorithm which is proprietary to Fixel Algorithms after years of development.
We listened to the feedback of many of Fixel EdgeHancer 2 users and used it to create this step forward.
We hope you’ll find it useful as well and hope to hear your feedback to get even better with the upcoming iterations.
Resources
- Fixel EdgeHancer 3 Product Page.
- Fixel EdgeHancer 3 Installation Guide.
- Fixel EdgeHancer 2 Product Page.
Key Words: Fixel Algorithms, Fixel, Fixel EdgeHancer, Image Enhancement, Image Contrast, Image Sharpening, Image Sharpening, Detail Enhancement, Contrast Enhancement, Detail Boosting, Edge Enhancement, Edge Filter, Photoshop, Plug In, Photoshop Plug In.