Fixel Detailizer 3 - Multi Scale, Edge Preserving & Halos Free Sharpening 8 November 2019

Our newest product, Fixel Detailizer 3 is Fixel’s new generation of Multi Scale Details Enhancer.
We’re really proud in this one. Mainly because it was really challenging to create algorithms which both state of the art and fast enough for Real Time use.
Fixel Detailizer 3 - Multi Scale, Edge Preserving & Halos Free Sharpening
Introduction
Our newest product, Fixel Detailizer 3 is Fixel’s new generation of Multi Scale Details Enhancer.
We’re really proud in this one. Mainly because it was really challenging to create algorithms which both state of the art and fast enough for Real Time use.
Detalizer 3 main features are:
- Multi Scale Details Boosting
Detailizer 3 works in a Multi Scale manner. Namely it analyze the image in different scales.
Namely one tool to handle small, medium and large details. - Edge Preserving Halos Free Sharpening
One of the artifacts of sharpening is Halos. Well, no more. Detailizer 3 can sharpen without creating any artifact. - 5 Bands / Scales to Set Details Amplification and Enhancement Level
The user can set the amplification level of each detail scale as easy as setting amplification level for different bands in Hi-Fi Equalizer. - Intuitive & User Friendly Detailizer 3’s UI was rebuilt according to Detailizer 2’s users feedback. It uses Photoshop CC Native Panel (HTML Panel) API to allow the user simple, intuitive and effective work flow.
- 32 Bit Internal Processing
All the Math is done in32 Bitprecision to avoid clipping, quantization and histogram distortions effects. 8,16and32 BitMode Support
The filter supports8,16and32 BitMode (RGB & Grayscale) including support for HDR Photography
We, at Fixel Algorithms, thought it would be a good idea to tell you some behind the scene details about sharpening and Detailizer.
It will be a little technical but easy to read and understand. If we made something too technical, please notify us and we’ll try make it clearer.
Edge Preserving Sharpening
This section will discuss the following:
- Classic Sharpening Methods & Limitation (Halos)
When we write classic we mean Unsharp Mask, High Pass and to some extent Smart Sharpen in Photoshop.
They have the main properties of being Linear and Spatially Invariant. This means they have no ability to adapt according to the image itself (Locally or globally).
Yet this property also makes them simple and fast. Really fast on modern CPU’s. - Modern Edge Preserving Sharpening Methods
Edge Preserving Filters are inherently different from the Classic Sharpeners. They adapt to the information they “see”.
While the date back to the early 90’s there have been major progress in this field. Modern algorithms do amazing work.
But before we dive into them deeper, let’s us tell you a wide known secret - All sharpeners are born as blurring filters.
So in order to understand classic sharpeners vs. edge preserving sharpeners we have to look into classic blurring vs. edge preserving blurring.
We’ll do the analysis using a simple generated image which emulates edge in image.
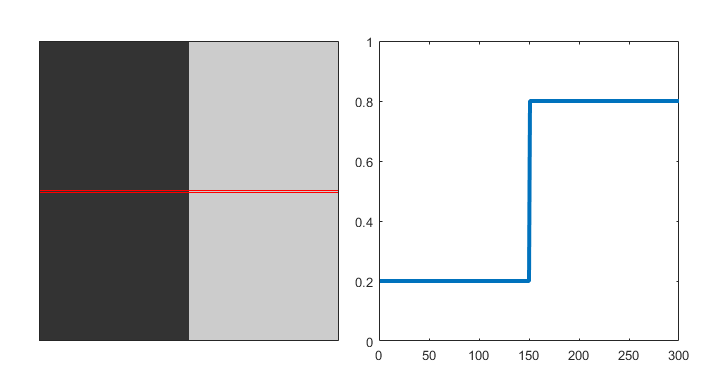
Classic Blurring & Sharpening
Before diving into the analysis we must refer you to a great (Funny!) video about sharpening made by our partner Davide Barranca - Double USM 2 Panel for Adobe Photoshop.
This video will explain some idea in a way only a video and Davide can. Really wort watching.
The sharpening procedure starts with blurring. When one says blurring in the context of Image Processing it usually means Gaussian Blur.
Indeed it holds in our case as well. Actually in Photoshop both Unsharp Mask and High Pass Filter are built upon Gaussian Blur blurring. Really!
Let’s see how it works. So we said sharpening starts with blurring. So what happens when we blur?
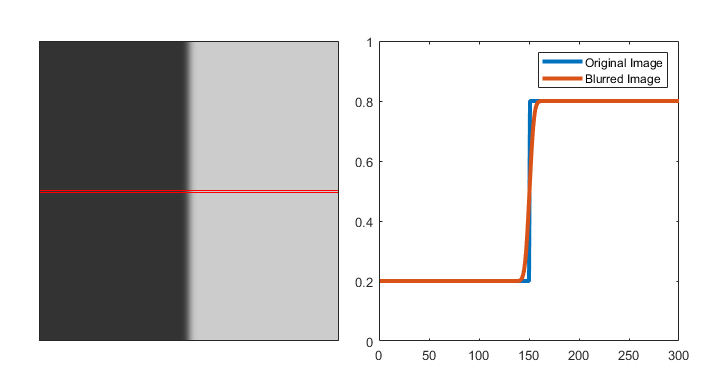
Blurring with Gaussian Blur creates smoothing of the edge. The extent of the smoothing is the Radius parameter of the Gaussian Blur.
Radius parameter in the Gaussian Blur in Photoshop is actually the Standard Deviation of the Gaussian Kernel the filter uses.What about sharpening? Well there is an important intermediate step before the sharpening. It is the subtraction of the blurred image from the original image.
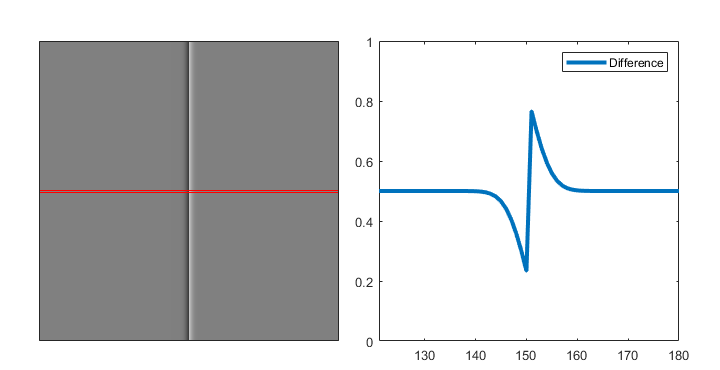
As can be seen, the difference (The Details layer as it is commonly named in the Image Processing world) has few properties:
- Symmetric - It is symmetric to the left left and right in its extent.
- Anti Symmetric - Its values are negative mirroring of each other.
Sharpening is all about multiplying this Difference by a factor and adding it back to the image.
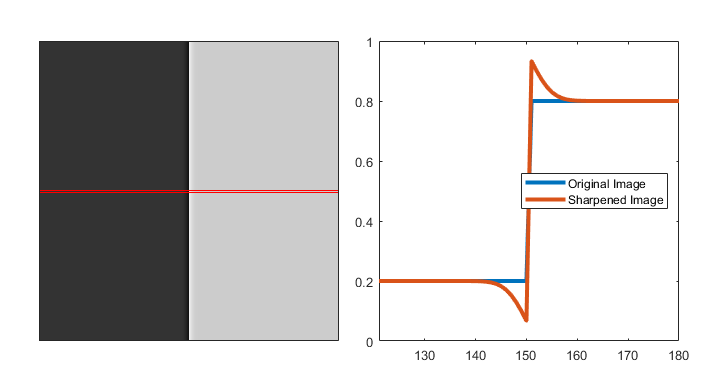
When added to the image one could see those added bumps compared to the original image. Those bumps are exactly the Halos.
Say hello to Dark and Light Halos. The generating forces of the Unsharp Mask. You can actually see the effect of the Radius Parameter (Extent of the roll off of the Halo) and the Amplitude Parameter (The height of the Halo).
Some will find the effect to be positively contributing. In some cases indeed it is.
The problem is there is another parameter we don’t control which plays a role here, the Edge itself. The more contrast in the edge the more prominent the effect is.
Real world edges are blurred to begin with (This is has to do with the Sampling Theorem, but that’s a story for another day).
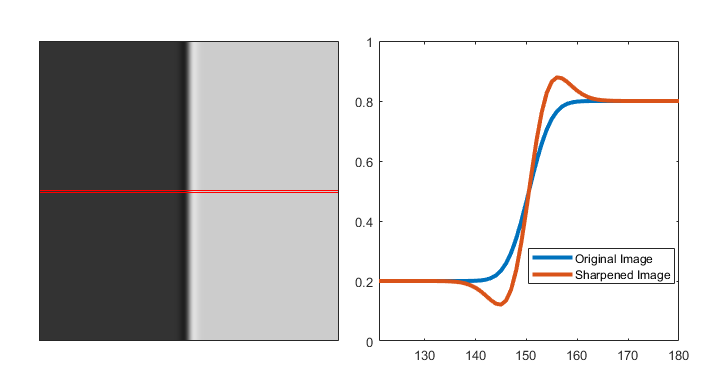
In real world image the effect looks much less satisfactory. The reason is the roll on isn’t as sharp as in the example above. It seems the peak of the halo gets too late.
But in both cases we get values which reach outside of the boundary of the expected values. This is the concept of Halos. This is a property of all Sharpeners which are originated from classic blur filters (Called Spatially Invariant Linear Filters).
They just average data form both sides of an edge while conceptually we’d prefer to average pixels on the left with pixels similar to them, on the left and the same holds for the other side.
What really bothers us about Halos is their Roll Off. The part were after the overshooting they get back to the local value. We would like the Roll Off not to happen.
Instead of roll off, we’d like small over shoot and slight increase of the values. So bright gets brighter and dark get darker.
Edge Preserving Blurring & Sharpening
So, we saw the problem with Gaussian Blur based filters. They all mix pixel values from both sides of the edge. So Image Processing researchers in the late 90’s started thinking about solving this.
In 1998 there was an article named - Carlo Tomasi, Roberto Manduchi, Bilateral Filtering for Gray and Color Images (Roberto Manduchi was in the Interactive Media Group of Apple).
It is the source of the Surface Blur we have in Photoshop. Basically a local filter which doesn’t blur across edges.
What happens if we use it on the same cases as above? Let’s see.
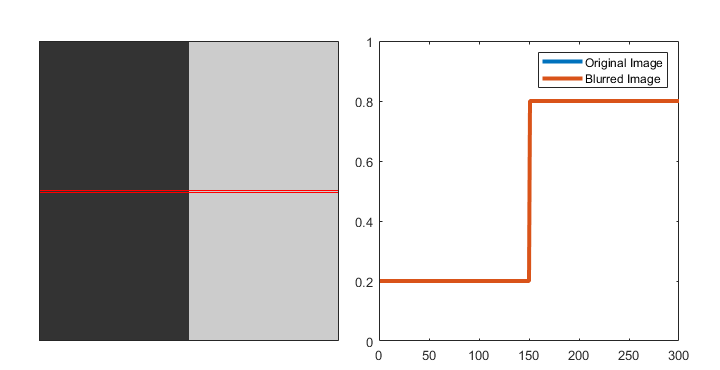
No blurring? Indeed. It didn’t average pixels on both side and since each side is flat, nothing happened. Can you think what would have happened if we had some noise there?
The Bilateral Filter would do the perfect thing to do, average all pixels which are similar, don’t mix with those who are not. Basically, this is what a good denoiser would have done.
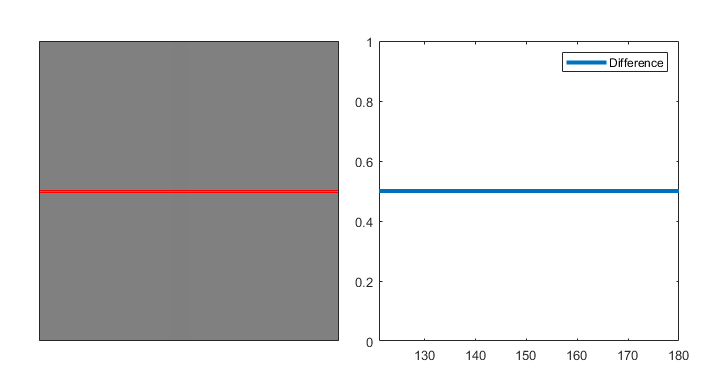
No surprise here. If no blurring the difference is none.
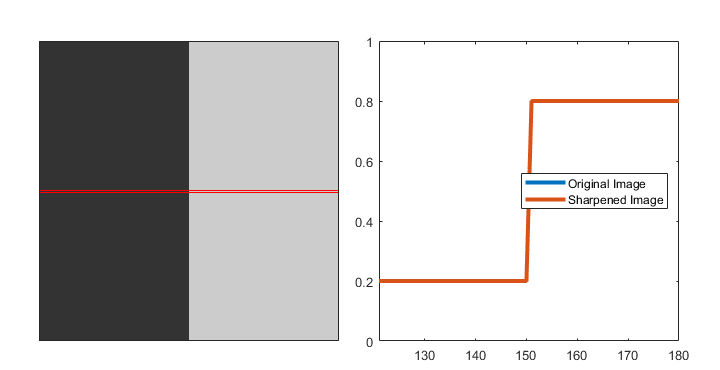
It is like the Bilateral Filter understood the image is sharp to perfection and did nothing.
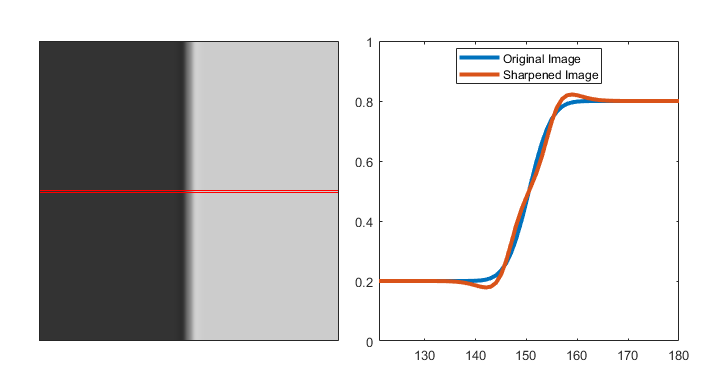
In the real world case we can see that the Bilateral Filter kept the Halos in a lower level. This is what we want, sharpener with lower level of Halos!
Could we do better?
It was 1998, so we certainly can do better. Detailizer 3 uses a different concept. While those filters are Local, taking decisions based on a local, limited in size, area of pixels Detailizer 3 looks on the image in a global manner.
Without getting into Math which will make everyone sad, being global let the filter spread bad things among all pixels. So it yields even lower level of Halos.
Let’s have a look on what will Detailizer 3 do.
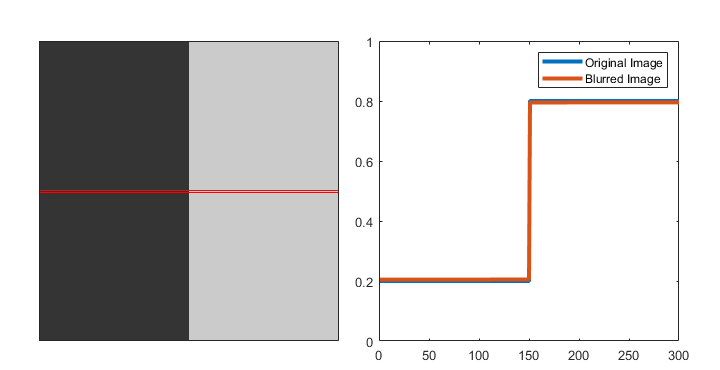
No one crosses to other side. Just like Bilateral Filter.
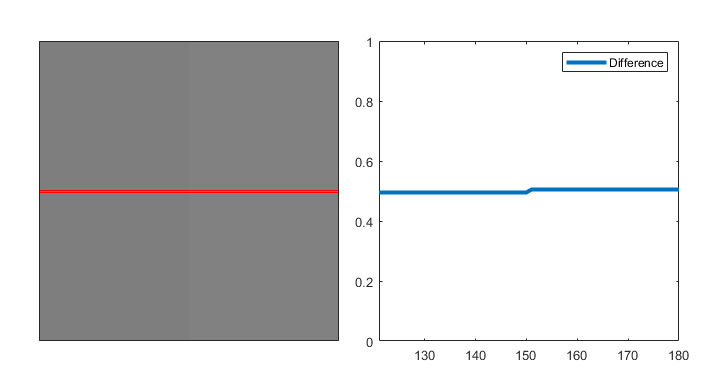
Copy & Paste: No surprise here. If no blurring the difference is none.
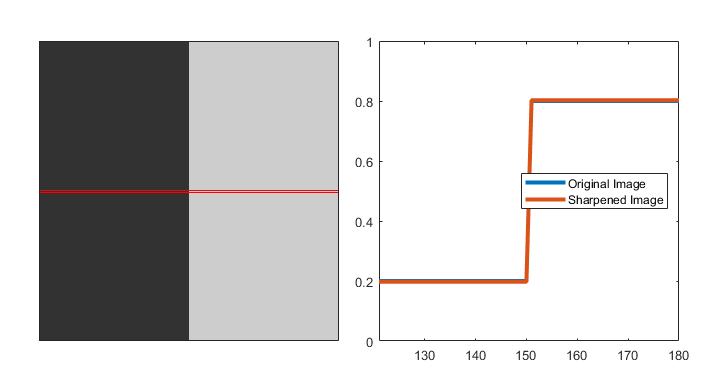
OK, when the Edge is perfect it does the right thing to do - Nothing. Just like the Bilateral Filter. So, why not take the Bilateral Filter?
Let’s have a look on the real world case.
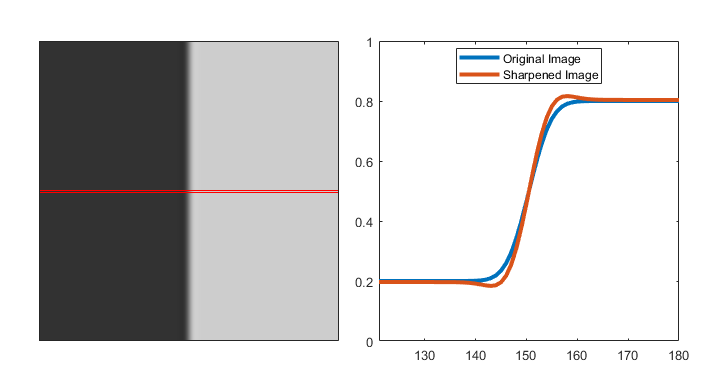
Here it is. Perfect! Not only we have no Halos it indeed do a real sharpening. The slope of edge get sharper, the contrast between all the flat area of both sides is increased.
In Detailizer we created our own Global Edge Preserving Smoothing Filter. It allows us control the height of the Halo and its Roll Off.
So when we set to low height and no roll off we get the result above. To show you the nice balance, let’s have a case where we give higher Halo but still no Roll Off.
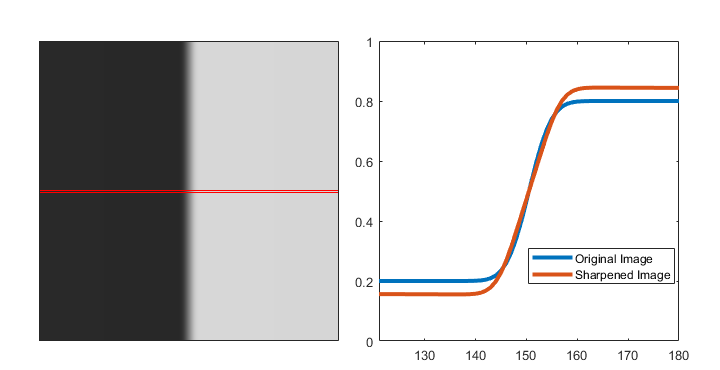
Nice, isn’t it? We increased the contrast between those 2 flat zones without the artifact of the Roll Off of the Bilateral Filter or the Gaussian Filter.
So we have made progress in the last 20 years, haven’t we? This is exactly what we want. Slight overshoot but no Roll Off.
Since Detailizer 3 works globally it “understands” those are flat zone on a side of an edge, so shrink the edge blurring and increase the local contrast.
We have accomplished what we asked for sharpening!
Multi Scale Sharpening
When we say Multi Scale Sharpening, what do we mean?
In a layman words, it means looking on the image at different resolutions / scales.
For instance, given an image at a given size, the Multi Scale approach suggests processing it at its original size and half of that and half of that and so on…
Well, at least it is one way to look at it.
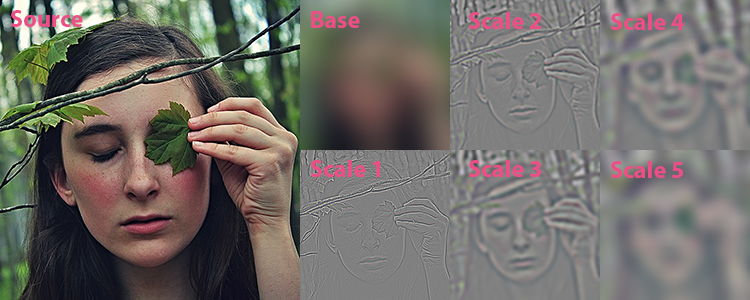
The approaches to implement Multi Scale Analysis are endless.
Yet in the Image Processing World it all started with the Image Pyramid.
Later came the Filter Banks and the the Wavelet Transform.
In Detailizer 2 our guideline was quality hence we used Undecimated Wavelet Transform which yields less artifacts (Halos / Ringing) than the classic Wavelets.
Yet Detailizer 3 required extending this idea farther as we used a blurring approach which is different.
This approach assisted us taking quality into next level though it also costs in more computational time. No free lunch here.
Summary
Fixel Detailizer 3 is a new generation of sharpeners. While Fixel Detailizer 2 brought the Multi Scale / Frequency to the market surpassing any classic sharpening tool (High Pass Sharpening, Unsharp Mask, Smart sharpen) Fixel Detailizer 3 brings another jump forward - Edge Preserving Based & Halos Free Sharpening.
It is intuitive and easy to use yet in utilizes state of the art algorithm which is proprietary to Fixel Algorithms after years of development.
We listened to the feedback of many of Fixel Detailizer 2 users and used it to create this move forward step.
We hope you’ll find it useful as well and hope to hear your feedback to get even better with the upcoming iterations.
Resources
- Fixel Detailizer 3 Product Page.
- Fixel Detailizer 3 Installation Guide.
- Fixel Detailizer 3 User Guide.
Key Words: Fixel Algorithms, Fixel, Fixel Detailizer, Image Enhancement, Image Contrast, Image Sharpening, Image Sharpening, Detail Enhancement, Contrast Enhancement, Detail Boosting, Multi Scale, Multi Frequency, Photoshop, Plug In, Photoshop Plug In.