Fixel Recolor 22 December 2018
![]()
Engineering is all about defining a problem, supposedly interesting and solvable, and solve it.
At Fixel, each one of the team is also a Photography Enthusiastic.
Hence each of has encountered the following situation - Looking at great image and thinking, “How can I recreates this colors in my image?”.
Since we’re also engineers, it seemed to us as a legitimate problem to define and try to solve.
More than that, it is solvable and we call our solution Fixel Recolor.
Fixel Recolor Photoshop Plug In
Background
Engineering is all about defining a problem, supposedly interesting and solvable, and solve it.
At Fixel, each one of the team is also a Photography Enthusiastic.
Hence each of has encountered the following situation - Looking at great image and thinking, “How can I recreates this colors in my image?”.
Since we’re also engineers, it seemed to us as a legitimate problem to define and try to solve.
More than that, it is solvable and we call our solution Fixel Recolor.
Color Grading, Color Palette & Style Transfer
Color Grading is the “signature” step of a Retoucher / Photgrapher / Designer working on his images. Usually it is one of the last steps to execute which gives the image a distinct look as its creator desired.
Color Grading has become a hot topic lately and like painters each Retoucher / Photgrapher / Designer has his own Color Palette (See Making Color Grading Easy Using Color Palettes) and “Brush” to do it.
Though it has become very popular to talk about color grading and color palettes, create tutorials, show before and after, etc…
The color grading concept was always there as one could see in CINEMA PALETTES which shows the Color Palettes used in classic cinema movies.
The point is no one created a tool for creating color palettes from images which inspire us, “Borrow” from a friend.
So what is Color Grading?
Basically it means remapping of colors.
Where the target colors are composed from the Color Palette selected by the Retoucher / Photographer / Designer.
There are many way to do so (The most general mapping tool would be curves) using tools in Photoshop.
Yet the most classic one is using Gradient Map.
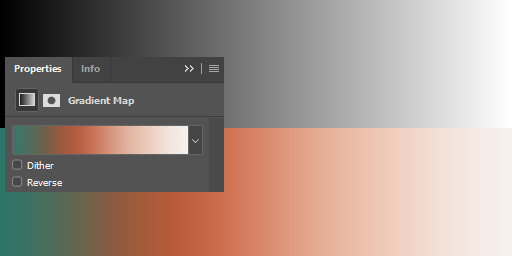
The Gradient Map of remaps image colors based on their Luminosity Values.

As can be seen in Figure 001 the Grayscale Gradient was recolored by the Gradient Map (Built with certain color palette) according to the brightness of the gray color.
Usually the Gradient Map Adjustment Layer is set to Soft Light or Overlay Blend Mode as one doesn’t want full replacement of the colors but just a subtle effect of color mapping.
The colors which compose the Gradient Map are the Color Palette and are chosen according to the atmosphere one wants to create.
How do we create a good color palette?
Well, some of us just has it, some used color palettes form others and some just guess.
We had 2 things to say about it:
- There are plenty of examples out there which are great example of a great Color Palette.
- There are Machine Learning based algorithms to extract Color Palette from a good example.
Namely, given a good example, can we transfer its Color Style (Style Transfer) to our target image?
Moreover, can we use it to create a Color Palette and use it when we want?
Indeed we can. All needed is to adapt those algorithms and fine tune them into the problem we started with.
Analyze a Reference Image, Extract a Color Palette from it, Apply the Color Palette in the Color Grading process of the Target Image.
What does it mean? Transfer Color Palette from any image which inspire you to any image you would like!
Fixel Recolor
So, ~4 years ago we started working on this problem - How to Extract a Color Palette from Reference Image and apply it on a Target Image.
We wanted a fully Automatic Process based on Machine Learning algorithms.
Some can do it manually, as seen in CINEMA PALETTES, but we wanted to be able to do it in a modern manner with smooth workflow within Photoshop.
Basic concept in Fixel Recolor is the Reference Image and the Target Image:
- Reference Image - The image to be analyzed in order to extract its Color Palette.
- Target Image - The image we would like to apply a Color Grading using a Color Palette.
Under the Hood - Analyze, Extract, Use (Color Grading / Color Mapping / Style Transfer)
In order to explain what Fixel Recolor does, let us use a reference image:

In order to understand how the Color Palette Extraction phase work one needs to have a look how is the algorithm see it.
The algorithm sees each pixel as a point in 3D Space of RGB Colors.

As can be seen in Figure 003, each pixel of this 400 x 400 (160,000 Pixels) in the reference image is represented as point.
Now, what’s the algorithm tries to do, using Machine Learning algorithm, it understand the “Center of Mass” of different groups of colors where the hint of how many groups there are is given by the user.
In the reference image it is quite easy to think about it (Well, that’s the reason it was chosen) and figure it out.
The algorithm tries to solve the same problem even in cases it is less intuitive to do but the idea is the same.
By default, the color palette is formed with the colors sorted by their Luminosity Value from darkest to brightest.
User Interface (UI)
The algorithm (Plug In) gets the number color samples in the Color Palette to extract from the user.
This can be done by a very simple Slider.
But the real job of the UI is to support many workflows of working with the Color Palette.

In order to do so the UI has basically 3 main sections:
-
Plug In Interaction Section
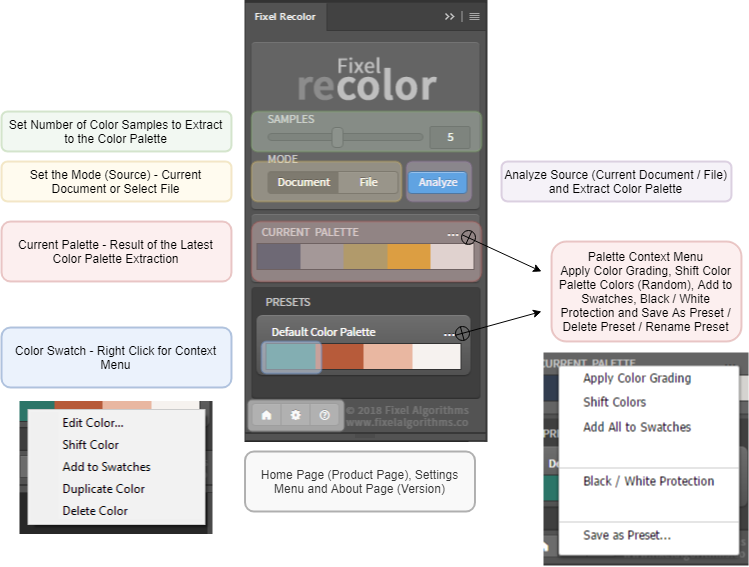
In this section the user configures the parameter of the Plug In in its Color Palette Extraction task. There are 3 main UI elements in this section:- Number of Colors Samples - Sets the number of colors in the color Palette to be extracted.
- Source (
Mode) - The user can set theMode(Source) which can be either the current Photoshop Document (Stamp Visible) or a File. - Analyze - Runs the Plug In as configured. If
Filewas chosen as source, the File Picker UI Dialog will be opened to chose the file fo analysis.
-
Current Color Palette Section
In this section the last extracted Color Palette is displayed (On first run it will show a Default Color Palette). The user can interact with it in 2 manners:-
Palette Context Menu (3 Dots on the right) - The menu of the Current Palette allows the user do the following:
Apply Color Grading- Create aGradient Map Adjustment Layerto color grade the image according to the Color Palette colors.Shift Colors- Randomize each color swatch in the Color Palette using a subtle shift of the color in RGB Space. User can use that to create a variation of the Color Palette (Though a subtle variation).Add All to Swatches- Saves all colors from the Color Palette to Photoshop’s Color Swatches.Black / White Protection- On / Off button which enables or disables the addition of Black & White at the edges of the Gradient Map during the Color Grading phase. This can assist keeping more natural Blacks / Whites in the target image.Save as Preset- Save the Color Palette as a preset. the user will have a Text Box to chose the preset name.
-
Color Swatches Level - The user can interact with each color swatch by itself. The user may use Drag & Drop to reorder colors and even move colors between Color Palettes (Preset / Current). The The user can also
Right Clickit to open a Context Menu with the following options:Edit Color- Opens an OS Native Color Picker Dialog Box fr the user to edit the color of the swatch.Shift Color- Adds a random subtle shift to the color.Add to Swatches- Adds the color to Photoshop’s Color Swatches.Duplicate Color- Duplicates the color within the current Color Palette. Useful in cases the user wants to add his own color within the palette.Delete Color- Removes the color form the Color Palette.
-
-
Preset (Color Palettes) Section
In this section the user can do everything he can do with theCurrent Palettewith the additional options of duplicating the preset and renaming it. This is useful in cases the user want to create numerous variations of a color palette or Mix & Match between different color palettes. Of course the user can also suer the Drag & Drop feature for each color swatch within a color palette or between color palettes.
There is also the lower section which has the Settings Menu, About Menu (Version of the Plug In) and Product Page link.
As can be seen we tried to make the UI fully interactive. Each element can be altered and played with in order to drive creativity and freedom of choice. Just play with it, there are endless options to extract and interact with color palettes.
Tips & Tricks
Number of Samples
The first instinct is to chose the highest number. we are all sold by higher and higher values.
Yet a good rule of thumb before setting the number of Color Samples to extract (JUsing Image Analysis) into the Color Palette would be asking yourself - If I had painted this image, how many different colors, which I know their names, would have I used?.
The emphasize here is on colors I know their name. This simple trick will get you much better results using Fixel Recolor.
Grab from the Internet - Windows
There is a nice feature added into Fixel Recolor once it is used in Windows. Actually it is Windows’ feature but still it is nice to know about.
When the user sets the Mode (Source) to File and hit Analyze a File Picker Dialog is opened. This dialog window is the native File Picker of the operating system.
Nice feature of the File Picker in Windows is being able to grab files from the Internet - HTTP Address.
So let us say you like an image on the Internet and you want to use it as the Reference Image then:
- Copy the HTTP address of the image.
For instance, use the image of the Eiffel Tower from Wikipedia -https://upload.wikimedia.org/wikipedia/commons/8/85/Tour_Eiffel_Wikimedia_Commons_%28cropped%29.jpg. - Select the number of Color Samples to analyze in Fixel Recolor.
- Configure Fixel Recolor to use
Fileas source. - Hit the
Analyzebutton and paste the HTTP address in the File Picker address.
Once you do that the output Color Palette would be the result of the analysis of the image from the Internet.
It doesn’t work on macOS as the File Picker in macOS doesn’t support inserting HTTP addresses.
Editing and Shuffling Palettes / Colors
We worked hard on the UI. Our motto was - Interactive Creative UI.
It means that any the user can interact with any element of the UI - Palettes and Color Swatches.
In our test group some (Minority) people missed some capabilities of the UI - Editing / Shuffling Palettes and Color Swatches.
So let us notify you that the following can be done:
- Palette Context Menu
Using the 3 Dots button at the right end of each palette will open a menu with the option to shuffle the colors of the palette.
It means that hitting this button will add randomness to each color of the palette - A random small shift of the color.
There also many other options in that menu (Well, Color Grading is there!). - Drag & Drop
You may use Drag & Drop to reorder colors within a palette and even to move colors from one palette to another one.
You may also Drag & Drop to reorder the presets you saved. - Color Context Menu
Use Right Click on the Color Swatches. It will allow you to edit the color, save it to Photoshop’s swatch or, god forbidden, delete it.
Black / White Protection
In many images we have Black as the deepest shadow of the image and White as the brightest highlight. Moreover, usually we don’t want to add a color shift to those.
This is why we added the Black / White Protection. What it basically does is protects the edges of the Luminosity values (Blacks / Whites) from having a color shift due to the Color Grading.
What it basically does is add Black and White at the edges of the Gradient Map hence Black is mapped to Black and White is mapped to White which means they don’t get any color shift.
The user experiment with this till the best result in the user eyes.
Black & White Images
Use Fixel Recolor to give Black & White images special color (Tinting) treatment.
It works like magic and results can be mush more impressive than Duotone.
Pay with the Opacity of the Gradient Map Adjustment Layer to set the correct intensity of the tinting.
Real World Examples
We can write a lot more and we intend to do so (Mostly Tips & Tricks as the possibilities are endless).
But nothing is like some good real world examples.

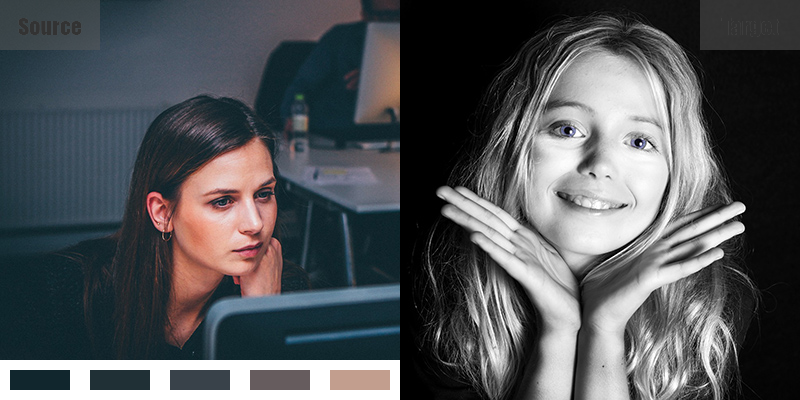
In Figure 005 we composed few real world examples of real world images (See Credit section).
On the left side you can see the Reference / Source image used to extract the Color Palette which can be seen at the bottom.
On the right side you can see the Target Image which will be Color Graded using the Color Palette. On the same side you will be able to see the Output Image which is the Color Graded Target Image.
It is easy to see the Style / color Transfer in action in those examples (There are 8 examples in the animation).
We are sure you can do even much better than this!
Summary
Fixel Recolor introduces a new functionality which has never been available in Photoshop before - Automatic, Machine Learning Powered, analysis of image Color Palette.
Once the user (Be a Retoucher, Photographer or Designer) has such a functionality it can be used in many ways.
We tried making the UI of Fixel Recolor intuitive and supportive of any user workflow.
The UI allows the user to create presets of Color Palettes, Integrate Colors into Photoshop (Swatches) and most of all - Recolor / Color Grade / Style Transfer the image.
Give it a try and share the results with us.
We’d love to hear what you can do and what you think.
Image Credit
- Product Page - Artist Paint Brush and Palette - Credit to Marco Verch.
- Product Page - Tangerine Sunset Hilltop - Credit to Lenny K Photography.
- Product Page - Girl in the Snow - Credit to Pexels.
- Product Page - The End Is Here - Credit to Missi.
- Product Page - Woman - Credit to Babienochka.
Resources
- Zeven Design - Color Grading with Gradient Maps in Photoshop.
- Photoshop Cafe - How to Color Grade a Photo Using Gradient Maps in Photoshop.
- Retouching Academy - Using Gradient Maps to Color Grade Your Photographs.
- PHLEARN - How to Color Tone Using Gradient Maps.
- Do It Yourself (DIY) Photography - Add Different Looks to Your Photos Using Only Gradient Map Layer.
- FStoppers - Quick Tips on How to Color Grade Your Photos Using Gradient Maps.
- FStoppers - Making Color Grading Easy Using Color Palettes.
Key Words: Fixel Algorithms, Fixel, Fixel Recolor, Color Grade, Color Grading, Color Mapping, Style Transfer, Color Transfer, Color Palette, Photoshop, Plug In, Photoshop Plug In.