Fixel Detailizer 2 by FloMC 9 March 2017

Reposted with permission from FloMC - Discover Fixel Detailizer 2.5.
Fixel Algorithms develops a good deal of Photoshop plugins. In the following weeks, I am deep diving into some of them, starting with the extremely useful and powerful Fixel Detailizer.
Reposted with permission from FloMC - Discover Fixel Detailizer 2.5
Discover Fixel Detailizer 2
Fixel Algorithms develops a good deal of Photoshop plugins. In the following weeks, I am deep diving into some of them, starting with the extremely useful and powerful Fixel Detailizer.
What is Detailizer and what does it do?
Fixel Detailizer is a plug-in for Adobe Photoshop (and After Effects).
What it does is, boosting details in your pictures, giving complete control over what will be boosted, how and how much.
What I like in particular about this tool, is:
- it is very precise
- it has a very intuitive interface
To deep dive into it, let’s familiarize with this concept: multi-frequency.
Now, if you are not the kind who like technical jargon, skip the next part and jump to the videos. At the end of each section there will be an explicative video that will add some extra to my text. If you instead like understanding why things work the way they do, bear with me and let’s start with frequency separation.
Part I
What about frequency separation?
If you are familiar with Photoshop, you might have heard of a technique called frequency separation. This is an efficient, even if not always an easy solution, that is frequently used in beauty editing by high-end retouchers.
Why frequency separation?
The idea, if we think about portraits, is that you should remove factors that diminish the quality of a picture, e.g. blotchiness on the skin, while preserving the details that makes it looks natural.
The skin is a sensitive part of a picture and defects can degrade it. So the first issue for a retoucher is to remove inconsistency from the skin, without altering its truthfulness.
That is, while we work on disparities caused by strobes, sweat, fat foundation, you name it, we might risk making the person look like a ceramic doll. If on a side we want to have a smooth skin, we also do not want to lose the texture, pores, and everything that makes a face look real.
In PS jargon, as easy as possible, let’s say: to work on frequency separation, two layers are required on top of a background layer. Those are two copies of the background who have separated roles: one where degraded parts are smoothed, one to keep textures visible and usable
| Layers as in Photoshop | Content | Role |
|---|---|---|
| Background copy | Where the details we do not want to lose are stored | preserve texture |
| Background copy | To remove inconsistencies. The tool used is Filter>Blur>Gaussian Blur which acts as blending tool | smooth |
| Background | The original picture | source |
The texture layer might be complicated to explain, and the purpose here is not to teach frequency separation, so just remember: in frequency separation, textures are separated from the stuff underneath it.
- Pro: very precise
- Con: painfully time-consuming
Video part I
Before we continue, you can give a look at my first video, where I include some examples and their limits when we try to boost textures and details on our pictures
Introduction to Fixel Detailer 2.5 - Part I from Flora Cusi on Vimeo.
Part II
What about Fixel Detailizer?
By now we know that high-end retouchers using frequency separation work on two layers: one to smooth, one to preserve texture. Fixel Detailizer does not visually show them, but the process is almost the same. It happens in the background, so to speak.
What Detailizer refines to a higher level is that we have the equivalent of 5 texture layers. Not just one, five. And here is where multi-frequency finds its meaning.
Why five?
Well, as the name says, Fixel Detailizer is about boosting details – which might work on different ranges.
We started with portraits, which are good examples.
There are different details on a portrait that we might want to control. In these different transactions might happen on a very small or on a larger area. In some thinner, changes happen in small parts of the screen, like hair. The transaction covers a larger space going progressively from lips to forehead.
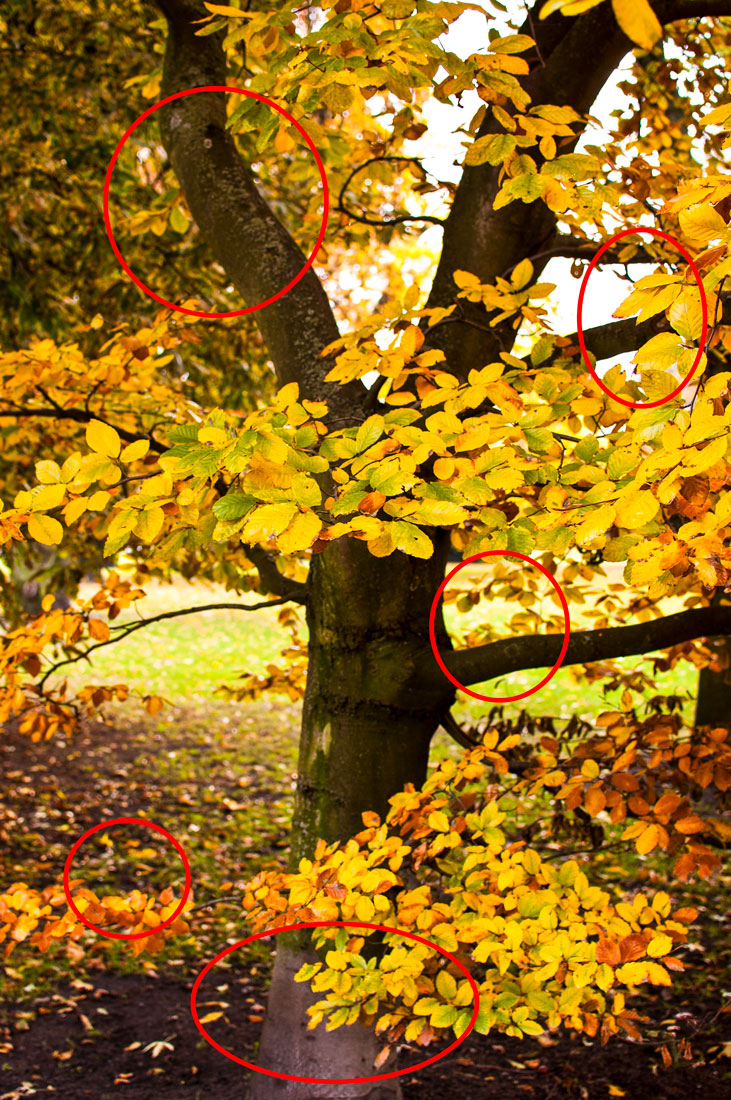
Same ways work on other pictures too: leaves on a tree are small details, branches and trunk occupy a wider range, and so forth.
Jargon explained: we work on a space on our screen, a picture covers a measurable area, variable spaces that we can edit. So we work on five different - spacial - frequencies that we can boost separately, focusing on some and ignoring others, or in synergy all over the picture.
- Pro: fast and precise
- Con: none as far as I can see
The evolution
For the geeks.
Fixel Detailizer boosts five different spatial frequencies from smaller to wider ranges. What’s the other big evolution? I had to investigate on how you can decompose frequencies: a lot of maths. Made easy, decomposing frequencies refers to something referred to as the kernel.
A kernel is the peculiar mathematic operation involved in the generation of the base and frequency layers – which affect the detail boost.
The vast majority of the existing plugins work on kernels based on Gaussian blur. Fixel Detailizer’s unicity is also in the fact that it has its own Wavelets kernel, not based the Gaussian blur, resulting in less prominent (and unwanted) halos.
Translate it in extremely focused on enhancing your details.
The interface
This is the best part about Fixel Detailizer. Its window is remarkably easy and intuitive!
Let’s give a look at it:
-
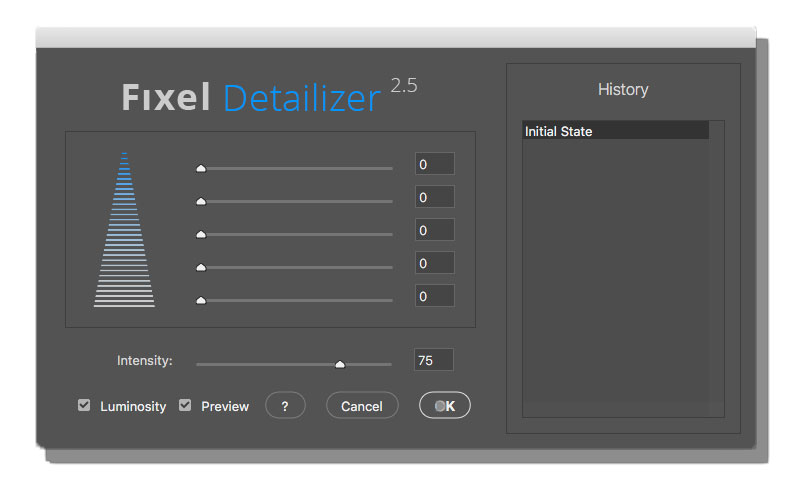
The triangle shape on the left suggests what the controls on its right are doing. On the top of the triangle, we have the smaller ranges, details like hair, small leaves, etc.
-
It expands progressively from a middle range and as you see the base of the triangle getting wider, we move to wider ranges, big area with a low spatial variation.
-
You can control the overall intensity of the boosting, by default Fixel Detailizer gives you a 75% opacity. You can increase or decrease it, but I find it convenient to keep it at 75%.
- As every good tool it has preview option
- By side of the preview you can see that it allows you to check or uncheck luminosity
Check or uncheck luminosity explained: consider the blending modes on the layer panel
Now, if you have your luminosity on in Fixel Detailizer (it is chosen by default), then the plugin will act as if the layer itself was in luminosity mode. This is a very, very useful solution and I would warmly suggest you to keep it selected
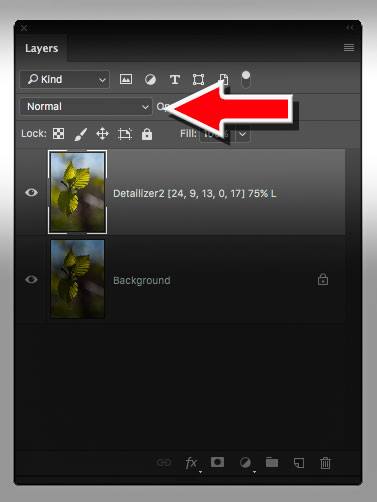
- Finally, you can check the progress of your editing on the right side of the screen. “History” recollects all your actions step by step. It works like the history panel in Photoshop. So you can’t get lost, and you’re able to quickly compare different sets of values time
By the way, you can also record Fixel Detailizer as a Photoshop action.
Video Part II
Now, if you could bear with me through my text, it is now time to watch the second part of the videos to see how Fixel Detailizer works.
Introduction to Fixel Detailizer 2.5 - Part II from Flora Cusi on Vimeo.
Key Words: Multi Scale Sharpening, Multi Scale Detail Enhancement, Multi Frequency Sharpening, Image Sharpening, Photo Sharpening, Photoshop Sharpening, Photoshop Plug In, Detail Enhancement, Frequency Sharpening.